 to add an item to your Itinerary basket.

This Christmas may not be exactly how we planned this year, but look on the bright side - there's extra time at home to spend on DIY gifts, decorations! We've put together some festive ideas to keep your house cheerful and your mind occupied this December...
DIY Decorations
If your Christmas decorations are looking a little sorry for themselves instead of going and buying new - why not make your own? This way tends to be more environmentally friendly and often give you the chance to reuse, recycle or upcycle what you already have. They are also great projects, which can also make great gifts! Take a look below for some ideas to get you started!
.jpg)
Salt dough Decorations
Equipment:
- Salt 1 cup
- Flour 2 cups
- Water 1 cup
- Twine
- Rubber stamps (optional)
- Cookie cutters
- Baking parchment
- Drinking straw or skewer
Method:
- Mix the salt, flour and water in a mixer until it’s smooth
- Roll the dough out between two pieces of the parchment paper until it’s about 1.5cm thick
- Stamp your designs using the rubber stamps or using the skewer to “draw” your design ensuring you don’t press too deeply, children can also use their fingers or plastercine/ playdoh tools. Then place your cookie cutter over the design and press down to cut out your decoration
- Cut out a hole at the top of your decoration with the straw or skewer for the twine but don’t add the twine yet
- Bake it in the oven at 120*c for about 3 hours to let the dough dry
- Once cool and dry you can add paint to them if you wish or just leave them white
- Thread the twine through for your finished ornaments
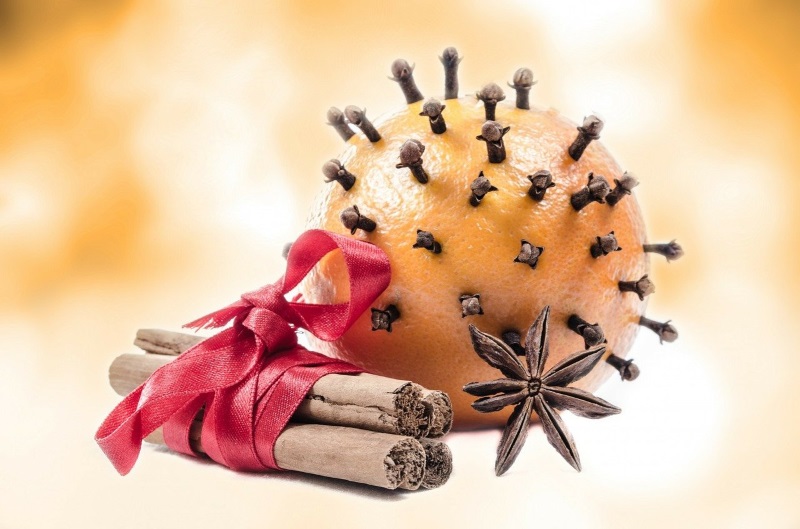
Christmas Pomander
Pomander balls are wonderfully aromatic, and so Christmassy. They can be hung on the tree, added to wreaths or placed in bowls with pine cones, cinnamon sticks and holly sprigs to be a gorgeous centre piece!
Equipment:
- Medium sized orange
- Whole cloves around 55gs per orange
- Piercing tool for example a ice pick, tooth pick or cocktail stick
- Ribbon
- Napkin/ cloth
Method:
- Cross tie the ribbon around the orange so you have four distinct sections of orange showing and tie the ribbon in a bow on top
- Use the piercing tool to poke holes in the exposed orange skin, do this over a napkin or cloth to mop up any juice. Keep the holes spaced fairly for apart
- Insert the cloves into the holes. They don’t need to be that close together, because the orange will shrink as it dries
- The orange will dry out over the next week and will shrink, but it will last for years
- Optionally if you don’t want to hang the pomander you can leave the ribbon off and create swirly or zig zag patterns for example with the cloves instead. You can remove sections of the rind to carve a pattern and add more interest
Recycled paper Christmas Decorations
Equipment:
- Old Paper such as newspapers or magazines
- Stapler
- Ribbon, twine
- Hole punch
Method:
- Cut the paper into strips around 3cms wide and varying lengths of 12cm, 15cm, 17cm, 20cm
- Use the 12cm strip as the middle and place two 15cm strips by each side so the top and bottom line up with the short piece and staple top and bottom to secure
- Repeat this with the 17cm and 20cm strips
- Punch a hole at the top and thread your ribbon through
- Hang your finished ornament on your tree
Pine Cone Garland (Pinterest)
A really simple idea but so effective. A lovely decoration, and also a great excuse for some blustery winters walk to collect pine cones!
Equipment:
- Pine cones )approx 15 cones per 1 foot/30cms of twine)
- Twine or string
- Scissors
Method:
- Collected pine cones need to be washed and then dried in the oven at 200*F for one hour. Stay in the kitchen during this to keep an eye on them
- Cut a length of twine to 3 foot or 90cms and 45 small pieces to wrap around the bases of the pine cones
- Make a loop on one end of the long length for hanging purposes
- Wrap a small piece of twine around each pine cone working it into the scales at the base and tie a single knot tightly and let the two short ends of twine hang loosely
- Tie each pine cone onto the garland twine with a simple knot. Slide the pine cone into place on the twine by tugging on the ends of the short twine. Make a second knot with your short twine piece to lock it into place
- Continue adding pine cones to the garland twine snuggling them together as you go. After knotting leave the short ends of twine hanging – you can use those ends to make adjustments
- Complete your garland by trimming the short ends and creating a hanging loop at the other end
Make your own Christingle
In 1968 John Pensom of The Children’s Society introduced the modern form of Christingle to the Church of England. It’s a wonderful Christmas tradition celebrated by churches and schools throughout the country anytime between Advent (4 weeks before Christmas) and Candlemas on 2nd of Feb, with Christmas Eve being particularly popular. In simple terms, it’s a symbolic way to explain to children the happiness that comes to people through Jesus. It involves children decorating an orange with a red ribbon, dried fruit, sweets and a candle to create a new visual representation of Christ, the light of the world, celebrated by the lighting of the Christingle candles.
Each part of the Christingle is symbolic:
The orange is the world.
The red ribbon is the love and blood of Jesus
The sweets and dried fruit symbolise all of God’s creation
The lit candle is Jesus himself, the light which came into the world at Christmas.
Hopefully your Christingle services will take place as normal but if not take a look at The Children's Society for ways to hold a virtual service and even fundraise!
Equipment:
- An Orange
- Some red ribbon or tape
- Four cocktail sticks
- A candle
- Tinfoil
- Dried fruit or sweets
Method:
- Tie your red ribbon around the orange
- Place a small piece of foil on top of the orange as this will catch any wax drips and push your candle into the orange through the middle of the foil enough, so it holds the candle in place
- Take your 4 cocktail sticks and thread dried fruit and sweets onto each of them and push the cocktail sticks equally spaced around the orange
Personalised 2021 Calendar
There is something special about giving and receiving gifts that are handmade and/or homemade! From cards, decorations, calendars and food & drink - they can be as inexpensive as you like and all will be unique and heartfelt! Look out for our tips below on gift wrapping to add the finishing touches!
It's safe to say we're all keen to look to the future and what better gift than a calendar! This is a great personal gift, particularly when we can’t necessarily see our loved ones as much as we’d like. Not to mention it's easy to post too!
Your calendar can be anything you want it to be - a child’s favourite drawing, painting, a single photo, or a selection of photos, felt work, needlework or a cross stitch. It just needs to be a decent size to add a hanging fixture such as string or ribbon (or make a hole to the top), plus a calendar tab to the bottom of it!
Photo calendar
Equipment:
- A3 piece of card, colour of your choice
- A4 piece of paper
- Scissors
- Pva glue/craft glue
- 2021 calendar tab (purchase from craft/hobby stores)
- A favourite photo printed to A4 or a selection of photos of various sizes
- Optional – biodegradable glitter or other decorative accessories
Method:
- Apply a thin layer of glue to the A4 paper & carefully place your photo on top of it and leave to dry
- Alternatively trim your selection of photos either so they line up perfectly together to cover the A4 paper or trim around them in random shapes and slightly overlap photos until they completely cover the paper in a more haphazard way which can be very effective. Leave to dry
- Once dry, put a thin layer of glue on the back of the A4 paper and position centrally on the A3 card. Put a small amount of glue on the top portion of the back of the calendar tab and position so it’s placed at the bottom of the A3 card and leave to dry
- Optionally you can now add decoration to the border, special words and even a little sparkle to highlight photos
- Once all dry, tape a small piece of looped string on the top of the back of the calendar make sure you use plenty of tape so it’s secure. Turn back over and admire your handiwork!
Alternative gift wrap
Whether you’ve spent the last few weeks carefully crafting homemade gifts, shopped locally-sourced products or you sat down one evening and ticked off many gifts online - now they have to be wrapped!
Many of us are now a lot more conscious of our environmental impact and look for ways to reduce this in our everyday life. We also try to be less wasteful for financial reasons. This is often trickier at Christmas when we are traditionally more extravagant and want the festivities to be extra special! But with a little pre-planning we can make small changes that will help the environment as well as our pocket, also make those gifts look extra special. Click here for some inspiration!
Furoshiki
Furoshiki is the art of Japanese fabric wrapping which has been part of Japanese culture since the 8th century. It’s a beautiful way to present a gift, it's environmentally friendly and also the recipient receives a beautiful scarf or piece of fabric to reuse again! Furoshiki cloth comes in a variety of sizes 45cm x 45cm or 70cm x 70cm being the most common, although other items can make perfect Furoshiki such as head scarfs, handkerchiefs, shawls, napkins and even pretty tea towels if folded into a square. Thin light weight fabrics are the easiests to fold!
An excellent video shows various ways you can fold the fabric and one of the many benefits of using fabric is that it’s very forgiving. It will wrap the most difficult of shapes, without ripping or corners poking through - you never have to worry about finding the end of the sellotape or running out of it! If you think this is a lovely idea but you don’t have any suitable fabric, why not head to your favourite charity shop, they will have a beautiful array of head scarfs and other suitable fabrics. These will probably cost a fraction of what you would have paid for gift wrapping paper and of course you are giving to a charity where this year in particular funds are needed more than ever!
Upcycle & reuse
If you’ve made cookies, fudge or chocolates then reusing old jars that have been had the labels soaked off, cleaned thoroughly and dried is a lovely way to present a gift! Some of the household products we buy come in really pretty shaped jars, we just don’t notice usually.
Once your home made goodies are secure in the jar then you just need to add some decoration and a homemade tag as suggested earlier. Other items to reuse are biscuit/chocolate tins, flower pots, cardboard boxes from deliveries and old mugs. Other items that can be used instead of traditional wrap are newspapers, magazines, comics and posters. Reusable bags such as bags for life and foldable shoppers can make great alternatives to gift bags. If you do receive a gift in traditional wrap, try and open it carefully so you can at least reuse the majority of the paper – although I expect in the excitement of Christmas morning this won’t work with many of the children’s gifts!
Brown Paper
If you prefer to use paper why not use brown paper! It’s recyclable, strong and reasonably priced. It doesn’t have to stay plain - you can decorate sheets with homemade stamps and embellishments!
- Cut your paper to size and fold around your gift, either secure with tape or preferably string
- Once your paper is secure you can then add more decorative elements, such as tying ribbon in the style and colour of your choice around it
- Add an extra decoration such as ivy, pine cones, a roll of cinnamon, a sprig of holly, or even a gingerbread cookie
- Create and attach a gift tag - a good tip and something you may remember from your own childhood is to make tags out of last year’s Christmas cards! You can also make them from photos or children’s drawings and can even make a cardboard frame for them, secure with string and these can then be used as Christmas tree decorations once the gift is opened!

Related
Comments
Comments are disabled for this post.


