 to add an item to your Itinerary basket.

No matter how small your outdoor space is there are still projects you can do that will brighten your days and encourage nature and wildlife into your lives during your 'Exetercation'...
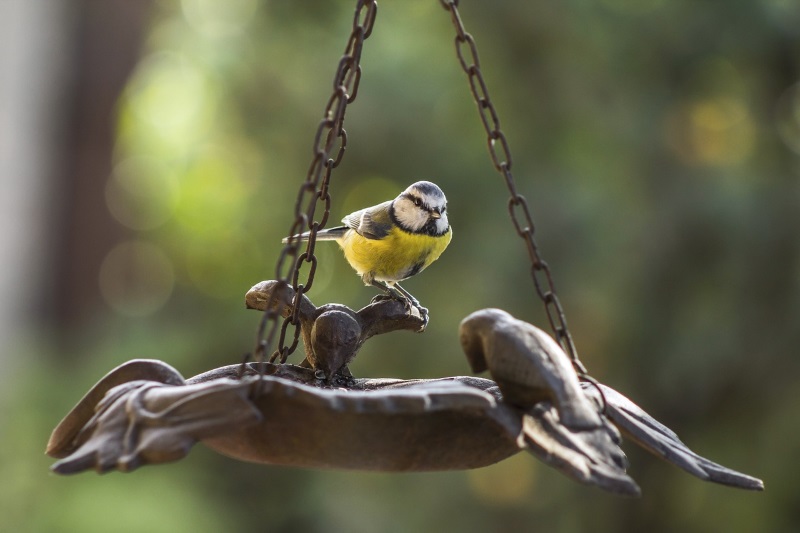
Bird feeders
These can be as simple or sophisticated as you like, they can be hung in gardens, balconies or even from window boxes or ledges.
Recycled Bird Feeder
Checklist:
- Plastic drinks bottle or milk carton (make sure they are clean)
- Wire or string
- Bird Seed
- Scissors
- Cut a hole in the side large enough to allow a free flow of seeds, but in such a way that it won’t all fall out on the ground in the slightest puff of wind, and won’t get wet if it rains.( an adult should do this for younger children)
- Make a few small holes in the bottom of your feeder to allow any rainwater to drain away with the scissors being very careful
- Hang it with wire, or even strong string from a tree or your washing line.or secure outdoor area.
- If your feeder starts to wear out or the food in it goes mouldy, recycle it and make another one! Remember to keep your feeders well stocked, especially in winter. Birds come to rely on them and will go hungry if you forget.
- You can decorate your birdfeed in all sorts of ways, just ensure any paint you use is non- toxic and avoid any small beads etc that may be mistaken for seeds.
How to make a bird bath by the RSPB
Checklist:
- A shallow, watertight bowl of some kind such as an upturned dustbin lid or large
- Plant tray.
- Some stones or gravel
- Bricks to raise the bowl up if it doesn’t have a plinth
- Rainwater or tapwater
Method:
- Lay out four bricks on a piece of open lawn or border, where the birds will have a good view all around but can dart into the cover of bushes or trees nearby if they need to. If you have cats visit your garden, make sure there is nowhere they can hide within pouncing distance.
- Put an upturned old, galvanised dustbin lid or your chosen shallow bowl on top of the bricks. Make sure it is stable.
- Put some pebbles or rocks in the water so the sides are not too slippy for the birds to give them a better grip.
- Fill with water (tap water is fine) and watch! Birds need most water when the weather is very hot or very cold. You’ll need to keep the bird bath well topped-up in summer and ice-free in winter.
- What you'll see - Blackbirds, robins, sparrows and starlings love a quick dip, while woodpigeons may just sit in the water to cool off! You'll even see bumblebees coming for a drink! Bathing helps birds keep their feathers in tip-top condition. If you see a bird having a bath in your creation and you have a camera to hand, take a picture and share it.
If you’re feeling very creative this is a great project to mosaic, you can either by mosaic tiles or if you have old crockery that has seen better days this can also be broken using a tile cutter and glued into a pattern of your design, once completed fill all the gaps with grout and wipe the excess away being careful of any sharp edges.
Check out Visit Exeter’s blog for more garden inspiration, with a little help from local celebrity gardener and enthusiast, Toby Buckand.
Cress egg-heads
This is such a simple idea, but children love it, they really feel the joyfulness of it.
Checklist:
- Eggs
- Cress seeds
- Kitchen roll
- Cotton wool
- Felt tip pens
- Egg box or egg cups
- Carefully cut off the top of the egg, pour the egg into a container not to waste it.
- Wash out the larger half of the egg shell taking care not to break it
- Scrunch up a small piece of wet kitchen roll into the bottom of the egg
- Wet a thin piece of cotton wool and place on top of kitchen roll
- Scatter a layer of cress seeds across the cotton wool sprinkle a few drops of water
- Sit egg shell either in open egg box or egg cup
- Draw you egg head a face using the felt tip pens
- Leave in a warm light place such as an indoor windowsill
- Sprinkle with water every few days
- Watch your egg head grow, when the cress reaches around 5cms you can snip it and use in sandwiches and salads.
Please note a similar effect can be made by children who cannot or do not eat egg by using a small dessert pot that has had its label removed and has been thoroughly cleaned.
Create your own fairy garden
This really is a magical project that you can customise to suit your own space, and it is certainly as enjoyable for adults as it is for children. You may immediately know the perfect garden nook for your fairy glen, but if not here are some ideas:
- The quiet corner of the garden that you’ve never known what to do with.
- Flower pots - the size is really up to you, the fairy garden can be as big or small as you like – also great for those who don’t have any outdoor space
- Tin Buckets
- Wheel barrows
- Planters & tubs
Unless planting directly into your garden add a layer of gravel or pebbles at the bottom of the container for drainage before filling with soil
Now the fun begins! You’ll need to decide what sort of fairy glen you want, you may want a woodland theme, or fairy castle, a cottage scene or even a beach theme, anything you can imagine. The important part is that you plan out your idea in advance and this will give the best results.
Planting
When choosing the plants for your fairy garden bear in mind your theme, but also the size of the plants, you don’t want plants that grow too big and you need to be careful not to over crowd the pot or the poor fairy folk won’t be able to move! If you are unsure, your local garden centre will be happy to give advice on which plants are best suited.
Decoration
There are lots of shops such as garden centres and craft shops that sell items perfect for your fairy glen such as miniature houses, bridges and figures, they will also sell items to help you make them yourself, but there are other options:
- You may have old ornaments such as figurines of people or animals that are just what you are looking for.
- Your children may have old toys, dolls house furniture, small dolls, Lego items or old train set scenery that are either perfect as they are or can be customised with paint, craft glue beads and bobbles. These are particularly ideal if you fairy garden is going to stay indoors as they will not need to be so weather-proof.
- You may have old pieces of wood or an old bird house that you can repurpose into a fairy house, wooden ice lolly sticks are perfect for signs, pebbles and sand make for paths and bottle lids can be recycled into miniature bird baths.
- Small solar lights will add a sparkle in the evenings
- Once completed you can sit back and enjoy the magical little world you have created.
Create your own herb indoor garden
Creating your own herb garden doesn’t have to be expensive or difficult, but it can be so rewarding. The kitchen windowsill is often the perfect spot, but good light is essential.
Checklist:
- Pots: These can be practically any container as long as they are sturdy and watertight. Consider if you’d like them purely to be functional, or add a little something to your home interior and say something about your personality; yogurt pots, empty drinks cartons, washed clean tin cans with a pretty chalkboard label added, old crockery, whether it’s all those non matching mugs that people keep gifting your family, an old tea set from the back of the cupboard including teapot and milk jug, mason jars with tags tied with string, old jam jars you’ve decoupage’d with wrapping paper and craft glue or simple terracotta pots.
Potting compost and seeds - some of the easiest herbs to grow indoors include:
- Basil: A favourite pairing for tomatoes, basil is easy to grow indoors. Pinch off individual leaves and add to salads, sandwiches and sauce or make pesto. Basil loves heat and bright light, so give it a southern or western window or use a grow light. Avoid cool, drafty spots, especially in the winter. Basil is not a long-term houseplant. You can expect to keep and use it for several weeks, until the stems start to grow woody. To ensure a steady supply, plant a new batch of seeds every few weeks.
- Chervil: It's an essential ingredient in Béarnaise sauce and pairs well with fish, potatoes, steamed carrots and eggs. Snip fresh leaves for salads, steep in white wine vinegar for dressings, or add them at the end of cooking to retain their flavour. Start chervil seeds in moist potting soil in deep pots to give their tap roots room to grow. After sprouting, keep plants cool (60 to 70 degrees F) and give them moderate sun. Replant every few weeks to keep plenty of fresh young leaves on hand.
- Chives: The spiky leaves of this onion-flavoured herb add a mild kick to eggs, soups, and salads, and make pretty garnishes. Use scissors to snip off individual leaves or give the whole plant a "crew cut" to keep floppy leaves tidy. Leave at least 2" of growth so that plants can re-sprout.. Chives grow best in bright light, such as a south-facing window.
- Mint: Snip leaves and sprigs for tea and mixed drinks, salads and desserts. Mint plants usually grow rambunctiously and their trailing, fragrant stems make them attractive houseplants. Keep the soil moist and give them moderate to strong light. Most are hardy perennials that can tolerate temperatures into the 30s.
- Oregano: A must for Italian, Mexican, Central American and Middle Eastern cuisines, and oregano is member of the mint family. Strip the leaves from snipped stems and add to tomato sauces, meat, casseroles, soups and stews. The dried leaves are more pungent than fresh. Grow oregano as you would other mints. Water when the surface of the soil is dry, but don't let it dry out. Give the plants moderate to strong light.
- Parsley: Choose curly or flat-leaf, but do give one a place in your kitchen garden. More than just a garnish, parsley adds bright colour and flavour to soups, salads and fresh sauces. It's essential in tabbouleh, and delicious in pesto, stuffing, chicken, fish and vegetable dishes. Harvest individual leaves by pinching stems off near the base. Grow in a deep pot with rich, potting soil and provide strong light.
Grow your own...
Tomatoes
Checklist:
- A packet of cherry tomato seeds
- Seed compost
- Small pots such as old clean yogurt pots
Directions:
- Fill the pot with the seed compost and level it out with your hands. Sow your seeds on the surface of the compost (spacing them according to the instructions on your seed packet) and cover with a small layer of compost and then water. Put them in a sunny and warm position. They will germinate in 5-12 days.
- Plant seedlings outside in a sunny position when the first flowers are starting to appear and when any risk of frost has passed. They can either be planted into grow bags, large pots or directly into the ground.
- Plant them approximately 45cm (18in) apart and if planting in a grow bag, plant no more than two plants per grow bag. It's important to note that if planting in a pot or grow bag, they will need a lot more water than if planted directly into the ground.
- If you're short of space, tomato plants can also be grown upside down in a hanging basket or bucket. Make a hole in the bottom of a basket or bucket and fill the container with compost and plant the tomato plant through the hole. Hang the container outdoors and your tomato plant will hang beneath it.
- Tomato plants need a lot of water for best results. Ensure the compost is always moist and water little and often.
- For best results it's also good to feed them every 10-14 days with an organic liquid fertilizer suitable for tomatoes.
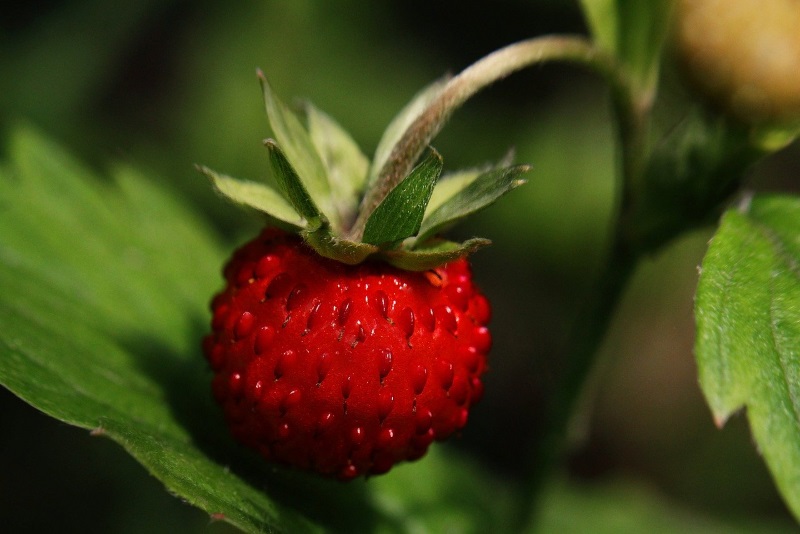
Strawberries
Checklist:
- Young strawberry plant (from a garden centre)
- Large flowerpot
- Watering can
- Pebbles
- Trowel
- Gardening gloves
Directions:
- Wearing your gardening gloves pop a few pebbles in the bottom of the pot and add some compost into the bottom half.
- Now carefully take your strawberry plant out of its little pot and put it into your big flowerpot. Add more compost to fill the pot.
- Put your plant outside in the sun and water it every day. Keep it sheltered from strong winds.
- When the strawberries have turned completely red they are ready to pick.
Have a 'bee-autiful' day
These hard working little guys are having a real tough time at the moment with their numbers in sharp decline, so why not have a day celebrating and promoting and helping our favourite busy bees?
Dress Code
You guessed it yellow, black or as stripy as can “bee”!
Menu ideas
Breakfast ideas: Honey on toast or porridge, or honey coated cereal
Lunch ideas: Honey & Mustard chicken with a side of your choice
Dinner: Sticky soy & honey pork with Asian Noodles
Dessert: Honeyed nut & pomegranate pots
Activities
Plant wild flower seeds, try and keep a “nature corner” in your garden where wild flowers can grow untouched, this is a haven for insects and particularly bees. If you are not sure what to plant you can actually now buy seed bombs of wildflower seeds that you scatter in your garden and they pretty much do the rest for you. These seed bombs or bee bombs as they are sometimes called can also be planted in window boxes and planters, so don’t worry if you haven’t got a garden, every green space no matter how small helps our bees while brightening your day.
This next one is a great “non-activity"… don’t cut your lawn, well not until the bees have had a chance to make the most of the clover, buttercups and daisys etc, this also gives you one less job to do, freeing up some precious guilt free leisure time – thank you Mr Bee!
Spot bees – we often think of the bee as a fairly fluffy stripy insect who bumbles around looking busy but of course there are lots of different types in fact there are 250 species of bee in the UK alone! Why not try and spot a bumble or honey bee to mention a few, on a bee-autiful walk around Exeter - check out Visit Exeter's blog for walking routes inspiration.
Read up on Exeter’s bee project https://www.princesshay.co.uk/community/princesshay-city-bee-project/ it’s great to know what’s going on in our own city.
How to make rolled beeswax candles
This is a great project for all ages although some supervision will be needed for younger children and the great thing is you have a lovely candle at the end to use at home, in your garden or gift to someone dear!
Checklist:
You can buy rolled beeswax candle making kits online and in craft stores but make sure it’s a rolled candle kit as other types involve melting wax which isn’t as simple or child-friendly.
- This should make two 10cm long tapered candles.
- One sheet of natural beeswax approx. 20cm x 40cm
- 2 pieces of candle wick 12 cms long
- A craft mat or chopping board to protect your work surface
- A pair of scissors
Directions:
- Cut the sheet of beeswax in half so you have two pieces of 10cms x 40 cms.
- Place the wick on the edge of the 10cm side with 2cms overhanging one end
- Start to roll the wax tightly around the wick and continue to roll away from you.
- As you roll apply enough pressure to press the wax onto the underneath layer.
- Always making sure the wax on the end opposite to the wick stays even as it is rolled.
- Once rolled the candle is complete and ready to enjoy.
Devonshire Honey Cake from BBC Good Food
If you've been out walking in the countryside, looking for bees and making candles then you're definitely ready for some tea and cake!
Ingredients:
- 250g clear honey & 2tbsp extra to glaze
- 225g unsalted butter
- 100g dark muscavado sugar
- 3 large eggs beaten
- 300g self-raising flour
Method:
- Preheat the oven to fan 140C/ conventional 160C/gas 3. Butter and line a 20cm round loose bottomed cake tin. Cut the butter into pieces and drop into a medium pan with the honey and sugar. Melt slowly over a low heat. When the mixture looks quite liquid, increase the heat under the pan and boil for about one minute. Leave to cool for 15-20 minutes, to prevent the eggs cooking when they are mixed in.
- Beat the eggs into the melted honey mixture using a wooden spoon. Sift the flour into a large bowl and pour in the egg and honey mixture, beating until you have a smooth, quite runny batter.
- Pour the mixture into the tin and bake for 50 minutes-1 hour until the cake is well-risen, golden brown and springs back when pressed. A skewer pushed into the centre of the cake should come out clean.
- Turn the cake out on a wire rack. Warm 2 tbsp honey in a small pan and brush over the top of the cake to give a sticky glaze, then leave to cool. Keeps for 4-5 days wrapped, in an airtight tin.
Relax with a facemask
If that hasn’t relaxed you enough then why not wind down with a homemade facemask (for adults only) and a homemade honey & lemon hot toddy (the hot toddy is hot water a dash of lemon juice and honey to sweeten, for adults a measure of whisky can be if preferred)
There are lots of facemask combinations if you search online, but please make sure you pay attention to all the ingredients and only make masks that suit your skin type and don’t have ingredients you may sensitive or allergic to.
Enjoy your 'bee-autiful' outdoor space!
Related
Comments
Comments are disabled for this post.


Comment removed by Post Author